You can also be interested in these:
- How to fix the computer has rebooted from a bugcheck error
- How to change the language in Windows 11
- How to configure parental control in Windows 11
- How to fix the Microsoft system error 8646
VirtualBox is a software designed specifically to create virtual machines in any computer. A virtual machine uses shared resources from your computer to fake the functionality of a totally different computer, doing so at a software level, without any physical components. On this virtual machine you can install and run any operating system and even programs, just as you would do on any other computer. The question is, can you install Windows 11 on VirtualBox?
Microsoft just launched the latest version of its most famous operative system, Windows 11, which by the way, doesn’t allow to be installed on a virtual machine. However, there is a way to get around this limitation and install Windows 11 on VirtualBox. Let’s see how this is done.
If you have already tried creating a virtual machine and installing Windows 11 in VirtualBox, you may have noticed that an error appears during the process. More specifically, this is what the error message says: “This computer does not meet the minimum system requirements to install this version of Windows.” It looks like, for many, this is a dead end, and nothing else can be done here. The truth is, you can bypass this error and continue with the installation.
How to install Windows 11 in VirtualBox bypassing the “Does not meet the requirements” error
The first step to install Windows 11 in VirtualBox is to download the software on your computer, if you haven’t already. You can do so by visiting its official page and using the download link corresponding to the operating system you wish to install on it. Once you have VirtualBox, launch it and click on the New button that you will see at the top of the screen.
Setting up the virtual machine in VirtualBox
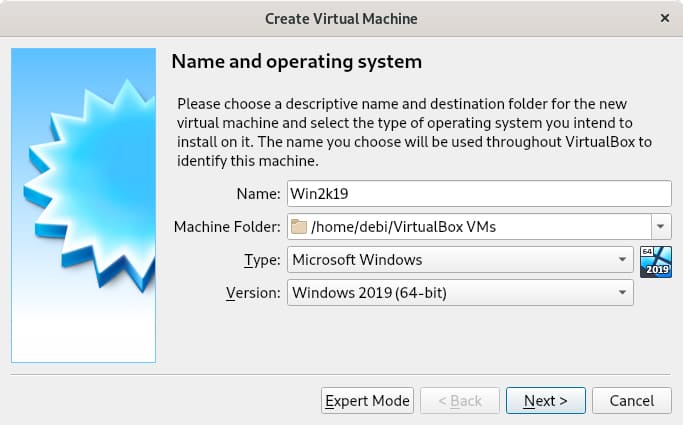
Using the virtual machine creation wizard, first choose the machine name, version and type. You can choose any name for the vitual machine instalation. Next, select the location you want this virtual achine to be. For the type and version fields, you can select Microsoft Windows and Windows 2019 (64-Bit) respectively.
After this follow these steps to configure the specs of your virtual computer:
- Provide at least 4 GB of RAM. However, you can add more memory to your virtual machine, if your computer allows it.
- Now is the time to create a virtual hard disk. Choose the option Create a virtual hard disk now and press the Create button.
- Check the VDI (VirtualBox Disc Image) option and continue with Next.
- Allocate a space of at least 50 GB for your virtual machine. Again, if you can give it more, go ahead.
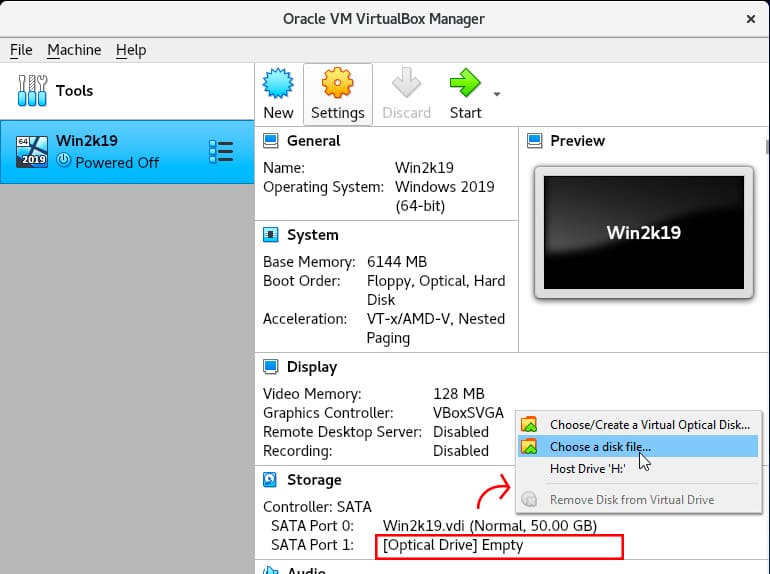
With your virtual machine created, now it is time to install Windows 11. Look for the OS installer, and in this case, of course, you will use the ISO that you obtain from the official Microsoft website. Right click on the Storage section, where it says “Optical Drive” and select the option to get the installation from a disk file. Browse using the file explorer until you find the Windows 11 ISO.
Next, click on the Settings button, located at the top of options, next to New and Discard.
Open the System section, click on the Processor tab and assign two CPUs to the virtual machine. Also, check the boxes that you will see next to Extended Features.
Install Windows 11 in VirtualBox step by step
Start the virtual machine and wait for the Windows 11 installer to load. Select the language, time format, and keyboard layout. Then click Next. After, proceed with these steps:
- Use the Install Now button to continue.
- Click on I don’t have a product key to skip the Windows 11 activation step.
- Choose the edition of Windows that you want to install on your virtual machine.
Finally, the error that we mentioned at the beginning of this article will appear on the screen. Here, you have to proceed as follows:
- Use the combination Shift + F10 to open the system console. There, type “regedit” (without quotes) and hit Enter.
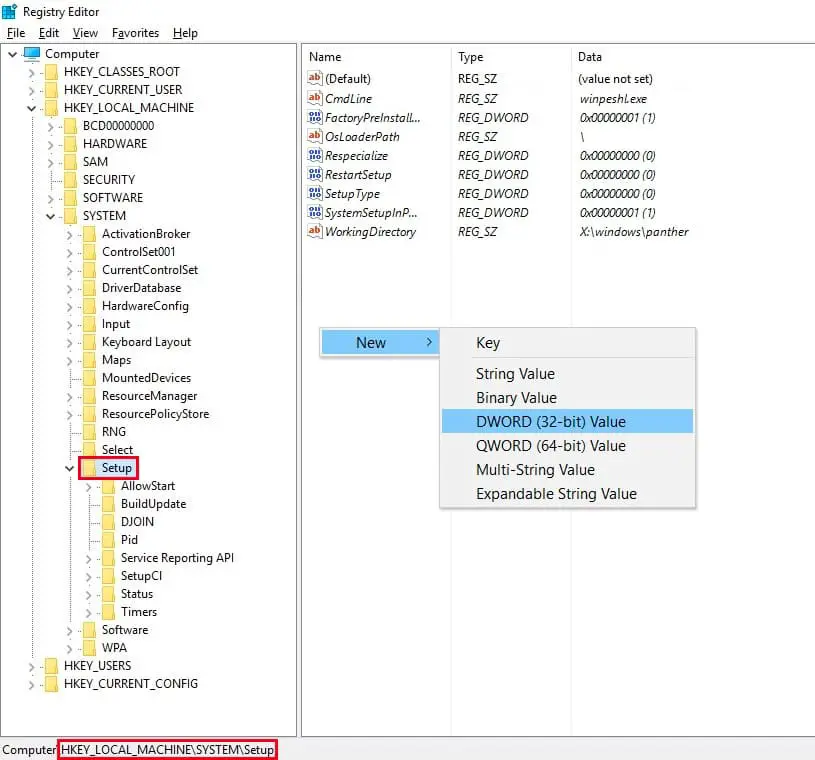
- The registry editor will appear on the screen. Navigate with the side browser to the following route:
Computer\HKEY_LOCAL_MACHINE\SYSTEM\Setup - Right click on the Setup key, open the New menu and click on Key. Name the new key LabConfig. Make sure it is nested within Setup.
- Open LabConfig, the new key you have created, and right-click on an empty space to see the context menu. Select the DWORD (32-bit) Value option.
- Create four 32-bit DWORD values named as follows:
- BypassTPMCheck
- BypassCPUCheck
- BypassRAMCheck
- BypassSecureBootCheck
- Then, access each of the key/value pairs you just created and set the Value data field to 1. Use the following screenshot as a guide to check that you are carrying out the entire process correctly.
- Close the registry and the system console. Then, click on the cross in the installation window.
- In the pop-up dialog select Ok to confirm that you want to exit the installation.
Again, you will find yourself at the beginning. Use the Install Now button and repeat the steps already mentioned. Unlike what has happened before, instead of the error you will jump to the dialog box window that shows the Windows 11 contract. We continue as follows:
- Accept the terms of the Windows 11 contract.
- Use the Custom option: Install Windows only (advanced) to continue.
- Create a new partition and select it to install Windows 11 on it.
- Finally, the installation process will start.
Wait for the wizard to finish and the virtual machine to restart. The duration of the installation will depend mostly on how powerful your computer is. However, being a virtual machine, Windows 11 will likely be finishing rather quickly.
After installing Windows 11 in VirtualBox, lets wrap up the configuration process
After taking completing all the steps in the previous section, Windows 11 will be installed in your virtual machine. All you have to do is finish the configuration on the system by indicating the language, keyboard layout and adding your Microsoft account, if any.
Once you finish, you will have a fully functional copy of Windows 11 on your VirtualBox. Remember that the process that we have described throughout this guide is compatible with all operating systems. That is, you can have a virtual machine with Windows 11 by following the steps mentioned in this guide in Linux, Windows 10, Windows 11 itself and even macOS (as long as it is not on a Mac with an M1 processor).
How to install the VirtualBox Guest Additions
VirtualBox Guest Additions is the package of tools provided by VirtualBox to improve the compatibility of the virtual machine with Windows 11. Thanks to them, the network drivers or the virtual graphics card are installed. The latter is very important because it allows you to adapt the resolution of the virtualized system to the size of the VirtualBox window. Plus, you’ll gain some features like clipboard integration and support for USB-connected drives. To install them in Windows 11, do the following:
- Open the Devices menu.
- Click on Insert the Guest Additions CD.
- Open the file explorer on your virtual machine and explore the CD drive.
- Click on the executable file to install the drivers.
When the process is complete, the virtualized copy of Windows 11 will be more compatible with VirtualBox. Although this last step is optional, it is highly recommended due to the large number of functions it adds and benefits we get from them.
More stories like this
- How to fix the computer has rebooted from a bugcheck error
- How to change the language in Windows 11
- How to configure parental control in Windows 11
- How to fix the Microsoft system error 8646
- How to install DirectX in Windows 11
- How to move the location of the Windows 11 Dock
Very helpful article! Thank you!
Any idea if this “backdoor” was left by MS intentionally?
I start wondering if this approach can be applied on a hardware labeled as “not compatible” for Windows 11.
It can for sure
Shift + F10 doesn’t bring up the regedit for me. Am I using the regedit on my main computer or on the windows iso giving the error during installation in virtual box? If Virtual Box, how else can I access the regedit if Shift + F10 isn’t bringing it up. Thank you.
Hello BBonsaye
You can alternatively open the Registry Editor on Windows the following ways:
1- Windows key + R; Then type “regedit” (without quotes) in the box and press “Run”.
2- Click on the Windows icon on the task bar and write “regedit” (without quotes). You’ll see the icon.
3- You can access via File Explorer using the address: C:\Windows\System32\regedt32.exe
Hope this information can help.