You can also be interested in these:
- How to fix static noise when your laptop is plugged in?
- How to protect smartphones against Pegasus virus
- How to get into eSport game and become a sportsman
- Annoying Mac issues and their instant resolutions
It is common for power interruptions, whether frequent or micro-outages, to occur in certain areas. To prevent problems in these cases, it is advisable to use an UPS, but if anyone is available, it is important for the PC to automatically restart after a power interruption. In this article, you’ll learn all about how to make the computer restart automatically after a power cut.

When you are in the middle of work and suddenly there is an interruption in the electrical supply due to a storm or any other unfortunate event, it is an uncomfortable situation. But if the precaution of protecting the data has been taken, you can continue working. However, there may be situations where the computer was performing a long-term task that was suddenly interrupted and it is necessary to restart it. Even if it is not such a complex scenario, you’ll simply lose time to resume your work, and who would want that?
How to make a PC resume its previous state instantly after a power outage? It would be ideal to have a fast storage system that can make a copy of the RAM and recover easily. But such a mechanism requires both very fast memory and manual activation by the operating system, making it unviable in a power outage event. If this was the case, it would continuously write to the hard drive or SSD, affecting its lifespan and congesting access to both.
Why are power interruptions a problem for the PC?
Power cuts are a recurrent problem for computers due to various reasons, such as infrastructure or adverse weather conditions in certain areas. In situations where it is not a serious issue, it is not a problem to manually restart the PC, but there are times when it is better for the computer to restart automatically and resume the interrupted work.
In some cases, we may have a low-consumption PC operating as a server, which allows us to download or share files or even function as a Firewall. It is also possible that we have equipment for cryptocurrency mining, or we have established a small cloud computing infrastructure to work from anywhere. Even a website hosted on WordPress.
If we are not at home when a blackout occurs, it is convenient for our PC to turn on again without manual intervention once the electricity source is restored. And this does not require advanced technical knowledge. Here we explain the two basic steps to configure a Windows computer so that it is always running, even after a temporary power cut.
Step 1: Configuring the Computer’s UEFI or BIOS
This is the best method of the two, as it allows you to modify the original hardware configuration. To activate it, we must access the BIOS or UEFI of our computer. During the start-up process, we only need to press the key corresponding to our PC model:
| Brand | Keys |
|---|---|
| Acer | Del / F2 |
| Asus | Del (A Series) F2 / Esc (For all the rest) |
| Compaq | F10 |
| HP | Esc / F1 / F10 / F11 (Depending on model) |
| Samsung | F1 (On PC) F10 (On Ultrabooks) |
| Sony | F1 / F2 / F3 (Depending on model) Assistance key (VAIO ) |
| Toshiba | F1 / F12 / Esc |
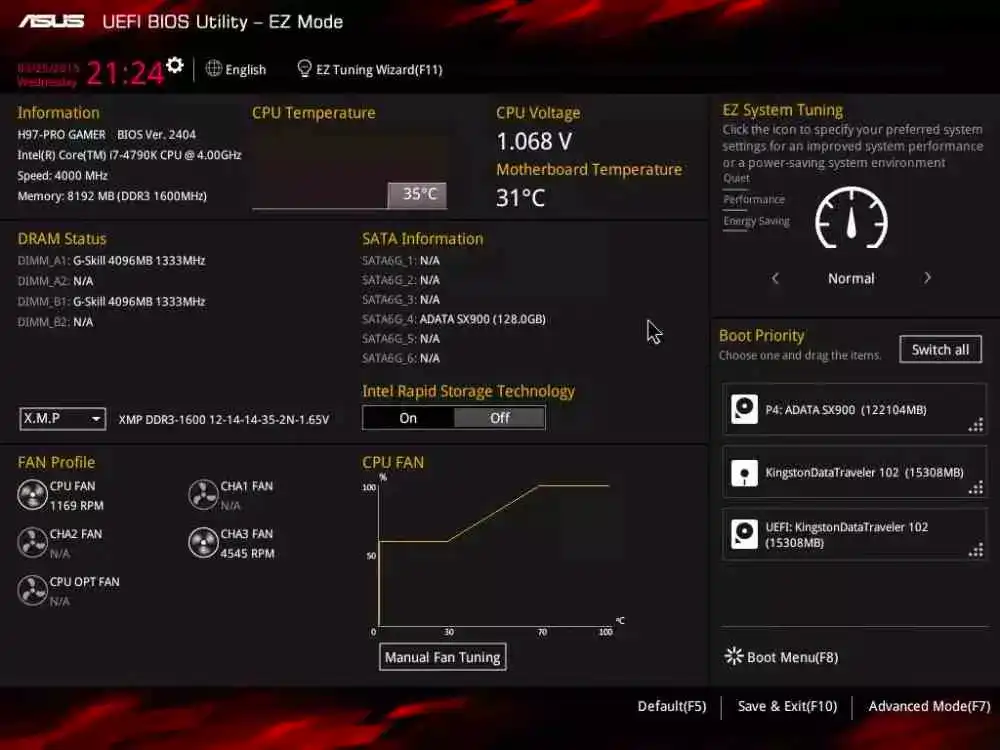
If you’re not sure which key to press, try pressing DEL, F2, F1 or F10 in that order, as the first two are the most common. Once you enter the BIOS menu, the appearance and organization of the options will vary depending on the manufacturer. To illustrate, we have used images from the ASUS manufacturer, but this method can be applied to any manufacturer.
To carry out the configuration, it is necessary to:
- Enter the BIOS or UEFI (depending on the platform and motherboard), and navigate through various sections, which will be different between manufacturers and types of systems. Normally, the correct sections are Power, ACPI Configuration, and BOOT.
- In them, we must look for a setting called Restore on AC/Power Loss or Next Boot After AC Power Loss, which generally does not vary between these two concepts.
- Once in the parameter in question, we will only have four options available, two for each type of concept. In the “Restore on AC/Power Loss” option, we will only be able to enable or disable the function, but if our UEFI includes “Next Boot after AC Power Loss”, we will have the options of “Normal Boot” or fast boot.
- We can choose what suits us best, but it is recommended to choose “Normal Boot” so that the UEFI performs a complete Checksum.
- After selecting the option, we will only need to press the F10 key to save the new BIOS configuration.
With this setting, you can ensure that your computer is always on and functioning, even after a power outage.
Step 2: Windows Configuration
After configuring the UEFI or BIOS to boot the system as soon as electricity is available for our computer, it is time to move on to the next step. The task of booting our PC is to activate all components and hand over control to the operating system, which, due to the loss of RAM memory, will not remember where it was before the power outage.
Windows tries to repair the system during the boot process of the operating system. However, if we are not present, it may offer us the option to restore the system or reboot, leaving the system hanging and waiting for our response.
Fortunately, this can be fixed by running a simple command in the command line. To do this, you just need to type CMD in the taskbar search field and right-click on “Command Prompt” and select “Run as administrator”.
Once in the command prompt, you should type the following line:
bcdedit /set {default} bootstatuspolicy ignoreshutdownfailures
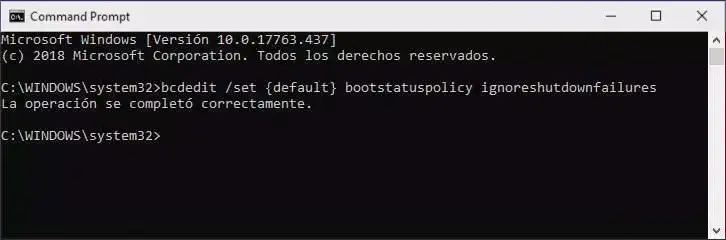
Press “Enter” and you will receive a message that the operation was successfully performed without any problems. This will prevent the operating system from freezing on startup and start normally. Although what we will have achieved by this point will be to see the Windows desktop, we recommend assigning the corresponding programs to start immediately after Windows starts so that they can continue their work without our intervention.
More stories like this
- How to fix static noise when your laptop is plugged in?
- How to protect smartphones against Pegasus virus
- How to get into eSport game and become a sportsman
- Annoying Mac issues and their instant resolutions
- Detailed guide on how cryptocurrency mining works
- Data migration: How to move your business data