You can also be interested in these:
- Is it ok to put cheap thermal paste on your CPU?
- CPU Thermal paste: application and uses best practices
- Arctic Alpine 17 CPU cooling fan review
- Which Intel CPU works best with liquid cooling?
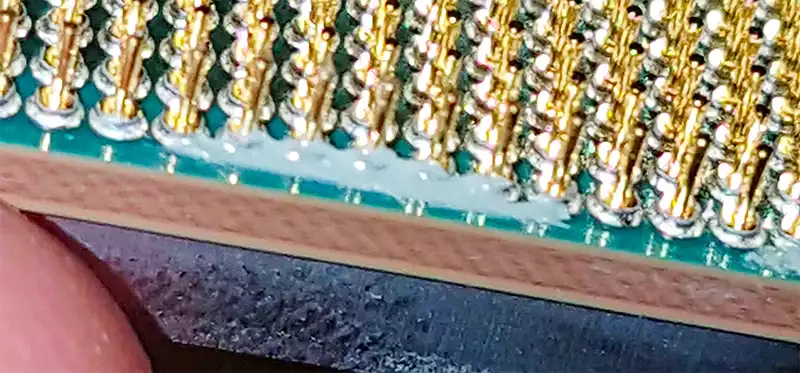
Thermal paste is used to raise the efficiency of heat transfer between two areas. If you’ve overclocked your CPU, you’ve had to deal with thermal paste. This substance helps to fill any gaps between your CPU and the heatsink. However, over time thermal paste can harden and become difficult to remove. So, if you’re trying to remove the thermal paste from your CPU pins, here are three quick ways.

The first way to remove thermal paste
Here are a few easy steps for removing thermal paste from CPU pins:
- First, try using an alcohol-soaked cotton swab. This will usually do the trick but be sure to use 99% isopropyl alcohol to avoid damaging the pins.
- If the alcohol is not working, you can try heating the paste with a hairdryer. This will make it easier to remove. Try not to overheat the CPU itself.
- Finally, if all else fails, you can carefully scrape the thermal paste with a sharp knife or tweezers. This should only be done carefully, as it’s easy to damage the pins. Once you’ve removed the paste, apply the fresh thermal paste before replacing the heatsink.
The second way to remove thermal paste
You will need:
- A can of compressed air
- A Phillips head screwdriver
- Isopropyl alcohol (91% or higher)
- A lint-free cloth
First, remove the CPU from the socket. This can be done by unscrewing the Phillips head screws on the back of the motherboard. Next, you will need to use a can of compressed air to blow away any dust that may be on the CPU or around the CPU socket.
Once the dust has been removed, you will need to use isopropyl alcohol and a lint-free cloth to remove any thermal paste on the CPU. Apply the alcohol to the fabric first, and then wipe down the CPU. You may need to repeat this step a few times to remove all of the thermal paste.
Once the CPU is clean, you will need to reinstall it into the socket. Be sure to screw in the Phillips head screws tightly to secure the CPU. That’s it! You’ve now removed thermal paste from your CPU pins quickly and effectively.
Now you’re ready to reinstall the CPU into its socket. Again, be sure to consult your computer’s manual for instructions on doing this. Once the CPU is back in its socket, you can power on your computer and resume using it.
The third way to remove thermal paste
The third way to remove thermal paste is to use a specialized cleaning solution designed for removing thermal paste. These solutions usually come in spray bottles, which can be found at most electronics stores.
First, you’ll need to remove the old paste from the CPU pins. You can do this with a cotton swab or a toothpick. Be careful not to damage the pins while doing this.
Once the old thermal paste is removed, you’ll need to apply the new thermal paste to the CPU pins. You can buy special thermal paste application kits with everything you need. Or you can use a small amount of thermal paste on a cotton swab or toothpick.
Apply the thermal paste in a thin layer to the CPU pins. Make sure that you don’t put too much or too little. Once you’ve applied the thermal paste, reattach the heat sink and fan to the CPU.
Tips for preventing thermal paste from building up on CPU pins
- Regularly clean your CPU and apply new thermal paste according to the manufacturer’s instructions.
- When removing your CPU from its socket, be careful not to bend any of the pins. Instead, use a product like Arctic Silver Ceramique Thermal Compound to fill in any gaps between the pins and the heatsink.
- Be sure to check that all four corners of the heatsink are making good contact with the processor die. If not, you may need to add more thermal paste or replace the TIM (thermal interface material).
- Make sure that your computer case has good airflow. If it doesn’t, consider adding more fans or replacing the case altogether.
- Consider using a liquid cooling system if you are overclocking your CPU. This will help dissipate heat more effectively and prevent thermal paste buildup on the pins.
- If you are still having problems with heat buildup, try using a copper shim between the processor and heatsink. This will help to conduct heat away from the processor die more effectively.
With these tips, you can avoid having to remove the thermal paste from your CPU pins in the future.
What not to do
When dealing with delicate electronic components, hasty actions can lead to disaster. For example, removing thermal paste on your computer’s processor might be a quick task, but it is essential not to take any risks when working near such vital parts of the machine! So be careful and follow these steps closely to go well in this process.
This is not the time to rush through your process. Instead, take as much care with these pins and socket connections as you would if they were sacred ground- because we know how important it can be. We recommend using gloves, even though there might seem like enough space between them for fingers; this will help avoid any accidental contact that could be bent or damage anything (like a CPU pin).
Be cautious when handling the processor because CPUs are effortless to bend pins. Unfortunately, pins can also break, so make sure you’re extremely careful with them if removing or installing thermal paste from your PC’s socket!
Conclusion
That’s it! You’ve successfully removed and reapplied thermal paste to your CPU pins. Now your CPU should be appropriately cooled and running at its best.
I hope this article was helpful! If you have any questions, feel free to leave a comment in the contact section, and I’ll do my best to answer them. Alternatively, you can contact me directly through my website or social media links. Thanks for reading.
More stories like this
- Is it ok to put cheap thermal paste on your CPU?
- CPU Thermal paste: application and uses best practices
- Arctic Alpine 17 CPU cooling fan review
- Which Intel CPU works best with liquid cooling?
- How to set CPU priority to prefer foreground Apps in Windows 8.1
- What is Dark Silicon and what is it currently used for?