You can also be interested in these:
- What is Dark Silicon and what is it currently used for?
- Comparison of the Z790 and Z690 Intel motherboard chipsets
- AMD Ryzen 7000X3D: What to expect from these new CPUs?
- Intel B760 vs B660 chipset: Features and differences
In Windows 8.1, you can set CPU priority to prefer foreground apps to increase your computer’s performance. This is a great way to ensure that the programs you are using the most get the resources they need to run smoothly. This article will show you how to set CPU priority to prefer foreground apps in Windows 8.1.

What is CPU priority?
CPU priority is a Windows 8.1 that allows users to schedule CPU time for apps based on their importance.
Windows will schedule CPU time for apps based on their importance when you set CPU priority to prefer foreground apps. Background apps that are not active will have lower priority and may be throttled or suspended by Windows to conserve resources. This can help improve the performance and battery life of your device.
If you have an app using a lot of CPU, setting its priority to Real-time can help ensure that it gets the resources it needs. Conversely, if you have an app that is barely using any CPU, setting its priority to Low can help free up resources for other apps.
You can experiment with different settings to see what works best for your PC. However, remember to set things back to “Normal” when you’re done so that all your apps get an equal share of the CPU.
How to change the CPU priority setting
To change the CPU priority setting in Windows 8.1, follow these steps:
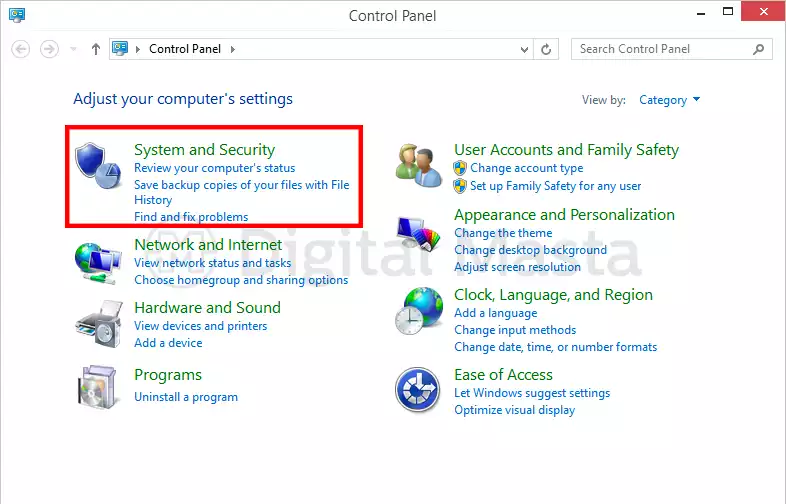
- First, navigate to the Control Panel.
- Next, click on System and Security.
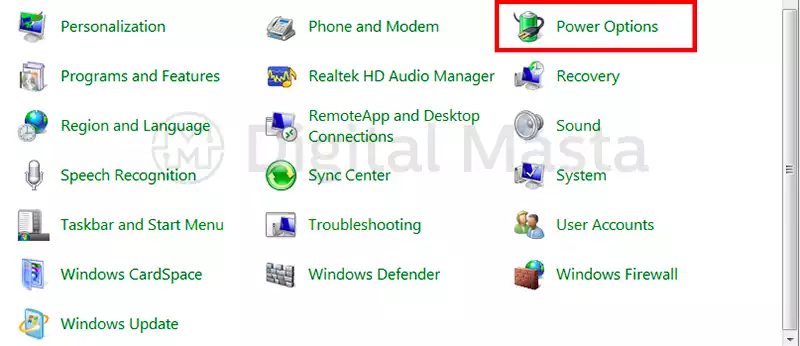
- Click on Power Options.
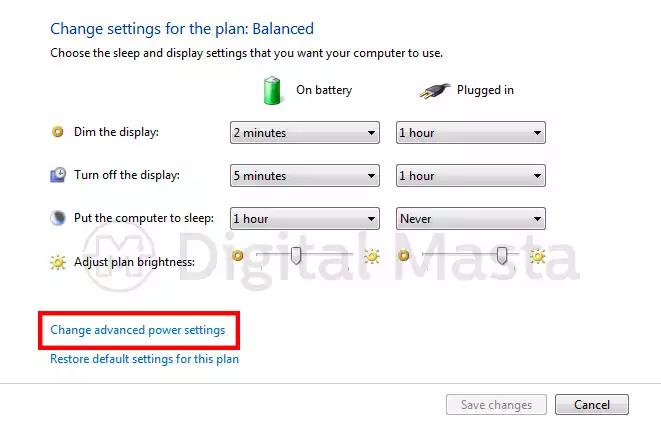
- Click on Change plan settings next to the selected power plan.
- Click on Change advanced power settings.
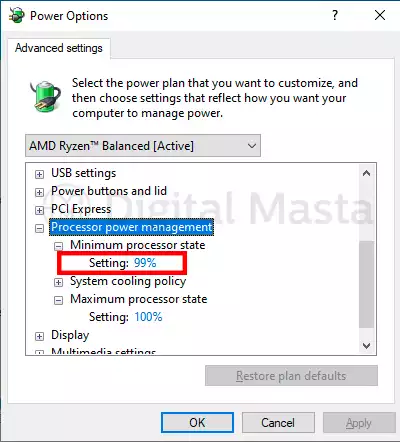
- Under Processor power management, expand the menu for Minimum processor state.
- Set the Plugged and Battery values to 0%. This will prevent Windows from throttling or suspending background apps.
- Click OK to save your changes. You can now exit the Control Panel. Your new CPU priority setting will take effect immediately. Enjoy the improved performance and battery life on your Windows device.
How to automatically stop programs from opening at start-up in Windows
If your computer is taking too long to start-up, you may want to reduce the number of apps that open automatically. Here’s how:
- Press Ctrl+Shift+Esc on your keyboard to open Task Manager. If you’re using Windows Vista or XP, click the Processes tab.
- Click the more details link at the bottom of the window to expand Task Manager.
- Click the Start-up tab.
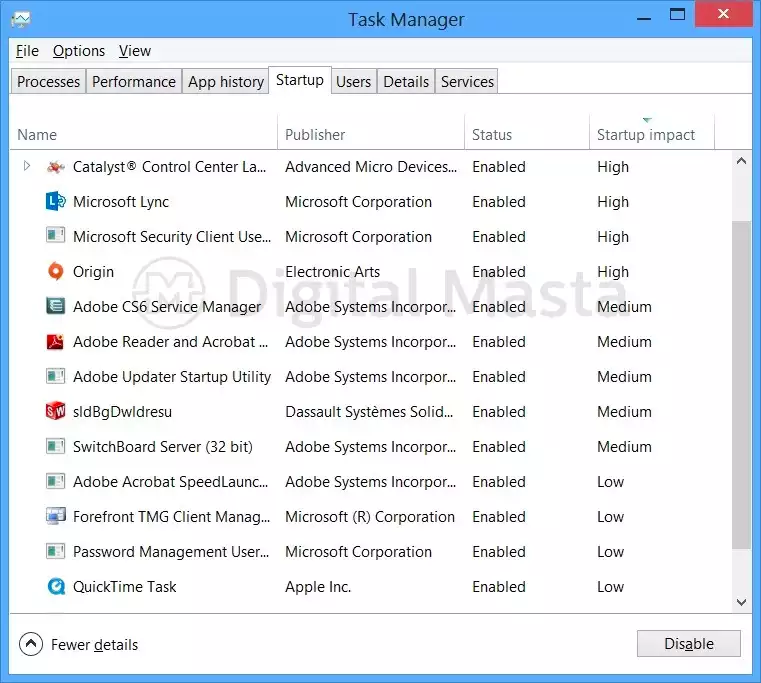
This will show you a list of all the programs that start automatically when your computer boots up. To prevent a program from creating automatically, uncheck its box on this list.
Disabling start-up programs can help speed up your computer, making it harder to use some apps. For example, if you disable the Dropbox app from starting automatically, you won’t get notifications when new files are added to your Dropbox folder.
How to change the priority of an individual app
Follow these steps, see this article for more details:
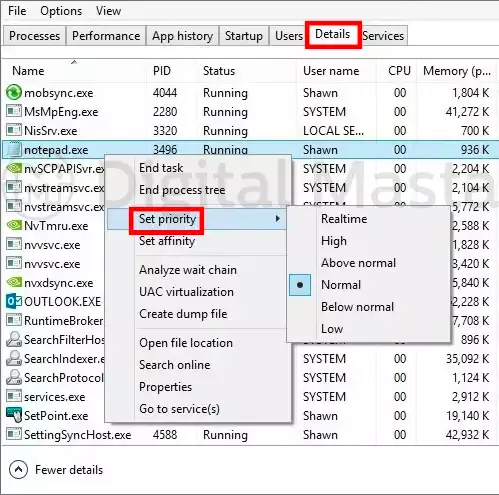
- Open the Task Manager by right-clicking on the taskbar and selecting “Task Manager” from the menu.
- Click on the “Processes” tab at the top of the window.
- Find the app you want to change in the list of processes and click on it.
- Click on the “Details” tab at the top of the Task Manager window.
- Click on the “Set Priority” dropdown menu and select either “Realtime,” “High,” or “Above Normal”.
Doing this will give that app priority access to your CPU, meaning it will be able to run faster and more smoothly. This can be helpful if you’re running an intensive program or game lagging.
Why adjust the CPU priority settings?
There are a few reasons you might want to adjust the CPU priority settings in Windows. For example, if you’re a gamer and enjoy your games to have first access to your computer’s resources, you want to set their CPU priority higher than other programs. Or, if you often have many programs running simultaneously and find your computer is slow or unresponsive, you may want to try changing the CPU priorities of some programs down so that other programs can have more processing power.
How to change the registry to high priority?
The two ways to make changes in the registry are through Registry Editor or Windows PowerShell. The first way is more straightforward because Microsoft has made some recent updates that eliminate specific tasks from this program and move them elsewhere – making it easier for users who don’t know how to edit settings by hand.
Follow these steps:
- Check your registry
- Open the Control Panel and go to “Administrative Tools.”
- Double click on Services
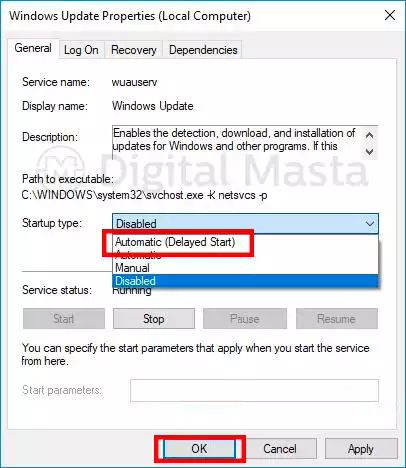
- Find a service called Windows Update or update
- Right-click in the window and pick “Add Services”, then find Windows Update and open its properties box.
- Modified the Startup Type to Automatic or Delayed Start, then click twice to close both boxes.
- Go back one step in the process and look for Windows Update again, but this time right-click on it; if you find an option named Properties next to your cursor, select that option by hitting Alt+ Enter.
How to change CPU priority in Regedit?
The answer to changing my processor’s priority in Regedit is surprisingly simple. All you need for this task are some basic computer skills such as navigating through folders and finding apps or programs. The default setting on most computers has a value of four. Still, if performance becomes sluggish, it may help resolve the problem by adjusting to five or three until things improve again – depending upon what kind/model machine you have.
Benefits of setting CPU priority to prefer foreground apps in Windows 8.1
The benefits of setting CPU priority to select foreground apps in Windows 8.1 are twofold. You can ensure that your most essential apps always have the processing power to run smoothly. Additionally, setting CPU priority can help improve your overall system performance by reducing time spent on background tasks.
Conclusion
We hope this article has helped you get the most out of your Windows experience. Do you have any tips for managing CPU resources in Windows? And don’t forget to check out our other Windows tips and tricks while you’re here. Thanks for reading.
More stories like this
- What is Dark Silicon and what is it currently used for?
- Comparison of the Z790 and Z690 Intel motherboard chipsets
- AMD Ryzen 7000X3D: What to expect from these new CPUs?
- Intel B760 vs B660 chipset: Features and differences
- Cache vs RAM memory: How much should my computer have?
- Intel B660 vs Z690, which is worth your investment?