You can also be interested in these:
- How to password protect a folder in Windows 11
- How to emulate Android on your PC?
- How to Disable SmartScreen on Windows 11
- How to remove Spotify ads on Windows
How many times we had to move images, text or files around across different screens only to realize we would have saved a precious time if the source and target windows were a little close together. What if we tell you that in Windows 11 you actually can split the screen in half, in three (one half and two quarters) and what not in four. This is a functionality is called Snap Layouts, was borrowed and improved from the Windows 10 version. Through it, the way you work can be optimized significantly for those tasks that require repeated execution over time, like copy-pasting and file management.

In this how-to guide we are going to go over the method on how to split the screen in Windows 11, and all the different ways we have available to perform this. Microsoft has included this functionality in the most intuitive way possible making it super easy to divide the screen on our computer. This comes really handy when we have super wide monitors and a lot of space to distribute our windows around. Technically, we are not splitting the visible work area on our interface, what we actually do with this method is arranging the active windows in a grid system that can be accommodated at convenience in our screen area.
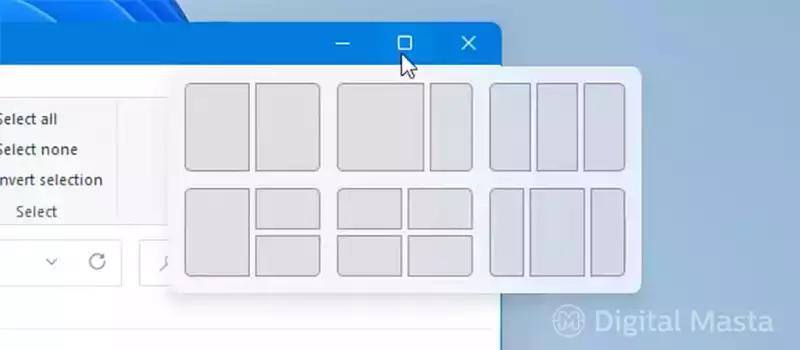
There are two ways we can do this. We can assign the positions automatically by hovering over the “maximize” icon, or we can do it manually through keyboard shortcuts.
How to split the screen automatically in Windows 11
How to divide the screen into two sections automatically in Windows 11?
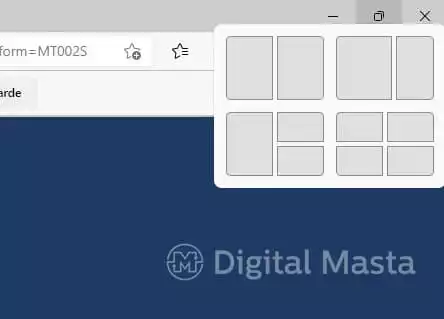
If we have 2 or more windows opened in our screen, and we were to divide each window to take equal amount of space horizontally (one right next to the other), there is a way to do this automatically. We can move our mouse cursor over the upper right corner of the active window, specifically over the maximize icon (if already in max mode, the icon will shows two small screens one on top of the other), right beside where the “close” icon is. Just by hovering, without clicking, will open up a small box with different options on how to split our screen. By clicking on the first option the layout will be re-accommodated to distribute the space of our screen equally between those 2 windows selected.
Depending on the box you click first will determine the side the active window will take. By clicking and dragging the lines that separates the two windows, you can make one size bigger than the other. This allows you to further customize your work area according to your needs.
The next option in the screen splitting dialog box leaves one of the two windows larger than the other. This is no different from the previous half and half operation, because on the latter you can still resize the windows to your liking. The only difference here is they will appear automatically in this proportion without having to resize.
How to divide the screen into three sections automatically in Windows 11?
Like we have experimented until now, if you had 3 (or more) windows opened in your screen, you can equally divide your screen space to accommodate them all just by performing the same operation. The only difference with 3 windows is that 2 of them will take 2 quarters on the screen in one side, the remainder screen will take the whole opposite side. For this to take effect you have to select the option with 3 squares on it.
Here you can assign the position you want for each, that way you select the one which will be display in the bigger side. When you hover over the “split by 3” option, you will see that the little square on the diagram gets selected, which means that will be the position the active window will take. To sort out the other two positions, you move your mouse over it and you will have the option to choose from all the remaining opened windows. The same with the third and last layout position, you move your mouse over it and select the window you want to be displayed there.
Once you have laid out all your windows, you can re-accommodate them by hovering over the “maximize” icon once more on any of the windows you wish to change position.
How to divide the screen into four sections automatically in Windows 11?
The procedure doesn’t get any different or more complicated than this. In the case we wanted to split the screen in 4 different quadrants on the screens, you would do it just as you did with 3 different window sections. Having them all maximized, hover over the split icon on the top right corner of the active window and after the floating menu pops, the last option with 4 squares is the one you will choose. Here you just don’t click on it, instead, you select the position you want the active screen to take from the 4 different positions. After that you sort out the remainder sections.
How to manually split the screen in Windows 11
Clicking on the button in charge of splitting the screen to distribute all our opened windows is fast and intuitive. However, there is an even faster (although not so intuitive) way of doing it. The way we are referring to is via Windows 11 shortcuts.
How to split the screen into two sections manually in Windows 11?
If we had many windows opened in our work area and we want to split the screen in two halves without having to use the maximize icon functionality, you select the window you want to position first and just by pressing Windows Key + (left arrow / right arrow) on your keyboard you will be automatically assigning one side of the screen to that specific window.
How to split the screen into three or four sections manually in Windows 11?
You can do the same thing with more windows at the same time. If you want to split the screen area into three or four sections manually, by adding the shortcut Windows Key + (up arrow / down arrow) to the mix, you not only will be selecting the position you want the windows to have in the vertical axis, if you had already picked either the left or right hand side, it will remember this selection and just occupy the quadrant on that specific side, up or down.
Splitting the screen using drag and drop in Windows 11
Alternatively, if you grab the window and drag it to any of the corners of your screen, they will be placed automatically into that specific snap layout position. If you want your window to take either the right or left sides, you drag it to any of the sides, near the center, and then drop it. If you drop the window closer to the top or bottom corners, it will take just a quarter of the screen instead.
More stories like this
- How to password protect a folder in Windows 11
- How to emulate Android on your PC?
- How to Disable SmartScreen on Windows 11
- How to remove Spotify ads on Windows
- How to create a video conference in Skype
- How to set up BIOS to boot your PC from USB