You can also be interested in these:
- Detailed guide on how cryptocurrency mining works
- How to add NFT to Metamask
- The end of mining with the arrival of Ethereum 2.0
- NFTs and the future of authentication: Notes on a revolution
Mining Ethereum, this fairly popular cryptocurrency, has become both a pastime for some and a professional business for many. The introduction of cryptocurrency to modern technology and computers has unleashed a plethora of activities and knowledge that many users are enjoying and reaping benefits from it. With these, the process to mine Ethereum in Windows with Nvidia or AMD GPU has sparked the curiosity of plenty. In this article we will be shining a light on the steps of setting up your computer with Windows operating system to successfully mine Ethereum using an Nvidia or AMD graphic card with the aid of mining software.
Steps to mine Ethereum in Windows using an AMD or Nvidia GPU
Before planning to get your feet wet in the waters of mining, there are some steps you need to take to configure your computer to its mining potential. We will try to keep these brief and to the point so you have the general gist of what will be necessary. For starters, Windows 10 or 11 is the best bet to those looking to get into mining, although the configuration is fairly straightforward, it is best to tackle these set of steps beforehand to avoid any obstacles along the way.
Step 1 – Make your computer never sleep
The first step will be to optimize the Windows’ energy saving feature. This, in order to avoid the system to suspend itself as this will prevent the mining to go about smoothly or not offer the complete performance we are hoping to get. By visiting the configuration of the system and turning off or selecting “Never” to the Screen Sleep and system suspension options, we will be closer to mining in no time.
Step 2 – Disable your antivirus
Second step will be to deactivate Windows Defender. It has become a great replacement or alternative for antiviruses and malware, but unfortunately, we need it away from our mining affairs, as in this rare case it does detect our software as malware. It will suffice to deactivate the Real Time Protection option and add an exclusion for the software before turning Windows Defender’s options back on.
Step 3 – Add an exception to our mining software
If you need further guidance into adding an exception on Windows, this can be done through the Windows Security option found in Updates & Security in your control panel. After clicking on Virus and Threat Protection you can go to the settings and scroll down to “Exclusions” to add or remove one. When adding an exclusion, you must select the folder containing your mining program and accept any further messages to conclude the creation of said exclusion to Windows Defender.
Step 4 – Configure the Bios of your motherboard for better performance
In addition to the Windows software settings covered above, we also need to configure the motherboard you plan to use to mine Ethereum in Windows with nvidia or amd gpu, as most of these are setups for gaming rather than mining, the best performance is obtained after some tweaking of the BIOS. The most important option to activate is the task for initiating the system after a power surge or loss, next to that is to deactivate the energy saving options for both CPU and iGPU on the processor, if available. Some other adjustments might be needed and covered further in detail in other articles, but these main settings will help you get started.
Choosing the right software
Now that we are pretty much prepared, all we need to do next is choose our program of preference and then start to mine Ethereum in Windows with nvidia or amd gpu. But which program to choose, you might ponder. We have prepared a guide with the two main programs you can choose from when trying to mine Ethereum in Windows with nvidia or amd gpu.
Using PhoenixMiner
For PhoenixMiner, a BitcoinTalk mining program, you will need to perform a work around as any web browser will potentially mark it as a threat. For this you can either bypass your browser’s download settings to allow you to keep the file, or like in our case, using a different web browser that lets you easily keep any file you download, Brave being a good option when performing this action.
Once you have your files, all you need to do is extract them and then do the following: a) Look for your mining pool and currency of choice, Ethereum in this case, and the pool is up to your liking, but we used GPUMine. Once we locate these files, b) we right-click to open them as text and search for the -wal string. On the predefined address and rig name that we will find here we can c) add our wallet and miner name, which can be anything, then d) change the predefined address to our own Metamask one, this step is of paramount importance to avoid our earnings to be sent to a different user. Finally, we can e) change the rig name, but this is not really mandatory or relevant. After doing this, we just save the file and close it. Opening normally the file will commence the mining.
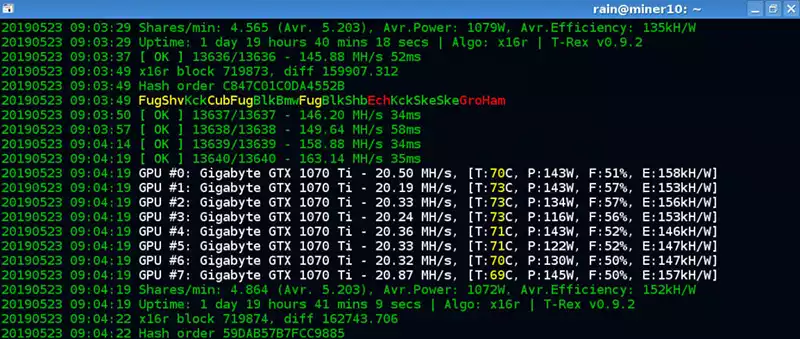
Using T-Rex Miner
For T-Rex Miner, which we can find on its official GitHub portal, we must note that this program is specially used with Nvidia GPUs as it is fully optimized to run with these. Another good thing about this particular program is its single file organization for currency and pools, this means we can easily configure it based on the mining pool we are most drawn to.
After downloading it, extracting the files and opening them up we need to search for the cryptocurrency we wish to mine, then we look for MiningPoolHub as our preferred pool, we open the files with a right-click as a text, and start modifying: a) user name (-u) which will identify us in the pool and the name of the miner after the dot. b) the password (-p) can be the same one we set up for other mining credentials, and it doesn’t have any specifications. After this we just save and close, to run we just click on the miner, and this will get it going.
Closing remarks
As you can see, the whole process is fairly simple and very straightforward once you know what needs to be done. As a final note, we recommend not using software as Minergate since it does not mine all that well, and for builds with AMD GPUs you may opt for using Claymore Dual Miner instead, as it can be configured the same way described here and get the best out of your GPU.
More stories like this
- Detailed guide on how cryptocurrency mining works
- How to add NFT to Metamask
- The end of mining with the arrival of Ethereum 2.0
- NFTs and the future of authentication: Notes on a revolution
- Cold vs hot crypto wallets: What to choose?
- How Blockchain game development companies are disrupting the gaming industry