You can also be interested in these:
- How to change memory frequency in BIOS Asus?
- How to allocate more RAM to a game for improved performance
- What are DIMMs and what are they used for?
- Where does the CPU store its computations?
For those out there that just essentially finished building their newest PC rig, or maybe just upgraded the RAM memory for a fairly speedier one, we come bearing some tremendous advice for you when it comes to using your memory to its fullest potential, which is quite significant. Since RAM memory’s speed standards are established by the JEDEC (Joint Electron Device Engineering Council) you will notice that even when an advertised speed of 3200 MHz is basically proved by the brand, after installing it on a gaming motherboard it might run at a different speed, often at a much lower speed than what’s expected, contrary to popular belief.
As a result of this, your memory might not really be running at the advertised timings set by your manufacturer when marketed to the audiences. With the exception of some models and boards that might not for the most part carry this option and also some commercial RAM models which are actually created with the standard speeds intended by default, for all intents and purposes most others are created with an XMP profile that you can tweak in order to release the memory’s full throttle in no time.
Here is where a handy technology item comes into play with the institution of what is called an XMP profiles which will eventually lead us to demonstrate the process how to enable Intel XMP profiles. This setup constitutes a series of instructions called Extreme Memory Profiles, these are instructions actually embedded into your RAM memory unit by the manufacturer that let the BIOS be able to read and configure the most favorable timings predestined by the brand which designed your RAM memory model.
Learning how to enable Intel XMP profiles by activating this set of features might be considered such a small thing to do, but the butterfly effect will optimize your memory’s speed for ideal performance when it comes to programs and gaming. Is it worth the ride? For such easy steps to genuinely obtain immense retribution, it seems to be essentially a great practice when it comes to taking advantage of your new build’s entire potential.
How to enable Intel XMP profiles
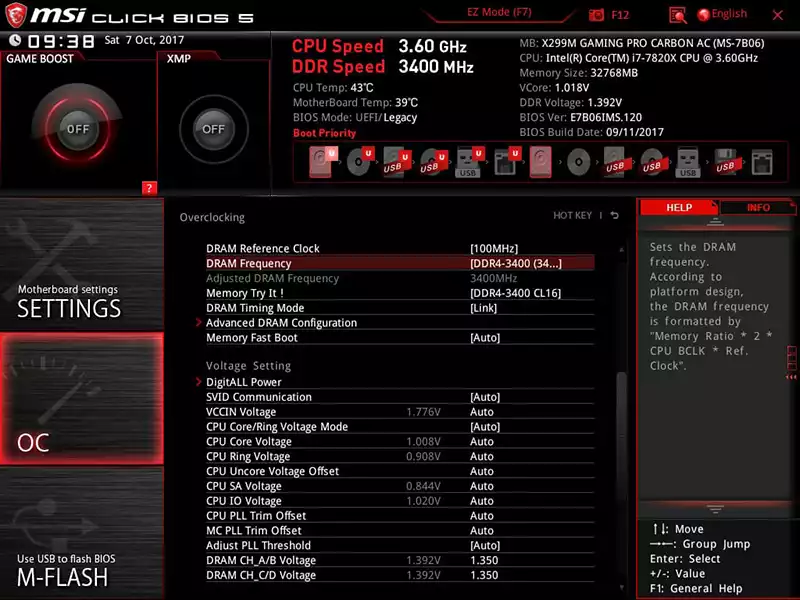
The correct configuration to enable XMP profiles can be found by entering the device’s BIOS. As soon as your unit boots, you can press either Del, Esc or F2 to enter the motherboards panel. The look and disposition of the options will depend greatly on your board’s manufacturer, but most will have the same kind of options with few to almost no changes, this will allow you to look for the option showing the XMP profiles somewhere in your BIOS in a matter of minutes.
Once located, you might see from one up to two or more profiles listed, but just one option for it to be enabled or disabled, also depending on your RAM memory manufacturer together with the possibility to select any of them if there are multiple profiles listed below the option. This will allow you to harvest the best speed out of your memory, on account of one more cautionary step you should consider carrying out. For this additional step you may want to check that the correct voltage is set for your RAM as well. In some cases, the voltage shown will also be low due to VDroop, an electrical discretion present in many ways to protect the chip on the unit from over charging or not having enough power at all. This is easily addressed by upping the voltage and simply pressing the plus key on your keyboard to complete this task.
After saving your changes and restarting your machine, the best way to make sure all this tweaking worked, is to head over to your operating system and check your RAM speeds. A great program that will easily list out your RAM’s speed for you is CPU-Z. After installing it, click on the memory tab to have a nifty display of all your new timing and speed, that in time should display the correct and intended speed for your acquired memory stick.
Is it in fact worth it to do then?
Now, you may be thinking, if this is how to enable XMP profiles, is it in fact an actually worth doing step to do every single time you buy new RAM memory for your specific setup? For starters, since it is as easy as one, two, three, we absolutely recommend going this simple yet absolutely effective extra mile.
In our opinion, regardless if your device is not even custom built, or if you don’t really perform an upgrade that often anyways. Is it in fact worth trying to enable the Intel XMP profiles to get as little boost on your random access memory as you can get? We definitely think so. The difference might not be easily noticeable for the most part, but in the long run, your machine’s performance will be up by a cinch and your device will perform with little to no delays.
There are various tests and benchmarks that have been performed in the search for an honest and solid answer about the RAM speed scaling difference that is present in normal and commercial usage and also while gaming, based on the approach of some of the tests, we can easily recommend having your RAM model run through enabled XMP profiles as this will scrape a great deal of performance boost to your experience.
Final thoughts
Simply put, we are all in for a performance booster whenever it can be applied, and even when some may feel finicky about accessing their machine BIOs, it is a step that most gaming users undergo nowadays in any case, to maintain or customize their rigs settings to the fullest and take advantage of those custom ordered equipment they spent they hard-earned money on. No need to be afraid of achieving overpowered speed when switching programs, performing tests and tasks or using your machines for its intended gaming purpose.
More stories like this
- How to change memory frequency in BIOS Asus?
- How to allocate more RAM to a game for improved performance
- What are DIMMs and what are they used for?
- Where does the CPU store its computations?
- Corsair Dominator Platinum RGB DDR5 review
- Corsair Vengeance RGB RT Review