You can also be interested in these:
- How to enable Intel XMP profiles to unleash your RAM potential
- What are DIMMs and what are they used for?
- How to allocate more RAM to a game for improved performance
- Where does the CPU store its computations?
PC building communities are always all about squeezing the most performance possible from every component, and this also applies to components like RAM. Being able to adjust your speeds according to what you need is one of the most appealing aspects of being a PC builder. Of course, for a newcomer, we can see how all this talk of overclocking and speeding up performance can get a little daunting.
That’s why today, we’re exploring methods to change the memory frequency for your RAM in the BIOS of an Asus motherboard. Asus motherboards are, after all, some of the most popular motherboards around. They’re very user friendly, feature rich and perform admirably. If you’re a new builder, we definitely recommend going for an Asus motherboard.
Will this work with other motherboard BIOS?
Although this guide is specifically for Asus motherboards, the general gist of things will mostly apply to any other motherboard’s BIOS. They won’t be specifically the same, but for all intents and purposes, the general idea will be the same. Once you’ve figured out how things work for the most part, it’s not actually all too difficult with other motherboards.
Do keep in mind however that changing your RAM’s frequency is a system-level change, and fiddling with settings you don’t know can potentially hurt your computer. If you’re not 100% confident in your understanding and capabilities, then maybe avoid making risky changes to your PC. Better yet, read up more on how to make changes in your own BIOS system to be sure you’re doing the right thing.
Now that we’ve cleared that up, let’s get into the reasons why you would want to change your memory frequency in your PC.
Reasons to increase or reduce memory frequency
So obviously there’s one big reason to change your memory frequency, and that’s to give your PC a nice, big boost in performance. Increasing the frequency of your RAM speeds it up, and having faster RAM is all that you need to raise your PC’s performance by quite a bit. This is exactly what you want if you’re looking for an increase in gaming performance or reducing video editing time.
But there are some reasons to underclock your memory as well, believe it or not. One of them is for compatibility. Especially if you’re mixing and matching different components, reducing the speed of one of your RAM sticks can allow for greater overall performance for your system.
Outside of this, you could also want to bring down your performance for power purposes. Perhaps you’re trying to tone down the power consumption of your system, in this case bumping down the memory frequency can be helpful. It’s important to know why you’re changing your memory frequency before you do it, so keep that in mind, now, let’s get into how it’s done.
Step 1: Enter BIOS through settings or boot up
First thing’s first, you need to actually get into the BIOS in order to make any changes. To get to this, you’ll want to head into the settings menu and find the boot settings. From there, change your start up to from the default desktop option to booting to BIOS so that you can access your PC’s BIOS options.
If this method doesn’t seem too appealing to you for whatever reason, you also get the choice of booting to BIOS through your bootloader menu. When you turn on your PC, keep an eye on the text that tells you what hotkey will help you get to BIOS. Typically it will be F1 or F2, but there are other possible hotkeys, just keep in mind.
Alright, now that you’ve done this, your PC should boot into the BIOS menu, giving you access to key settings for your PC components. From here, move on to the next step.
Step 2: Navigate to the AI Tweaker option and find memory frequency
From here, you’ll see a whole slew of settings that you can navigate through by using your computer’s keyboard. For the most part, regardless of what CPU you use, the options should be fairly similar and simple to navigate. Familiarize yourself with the layout, and make sure not to fiddle with too many settings, especially ones you aren’t familiar with.
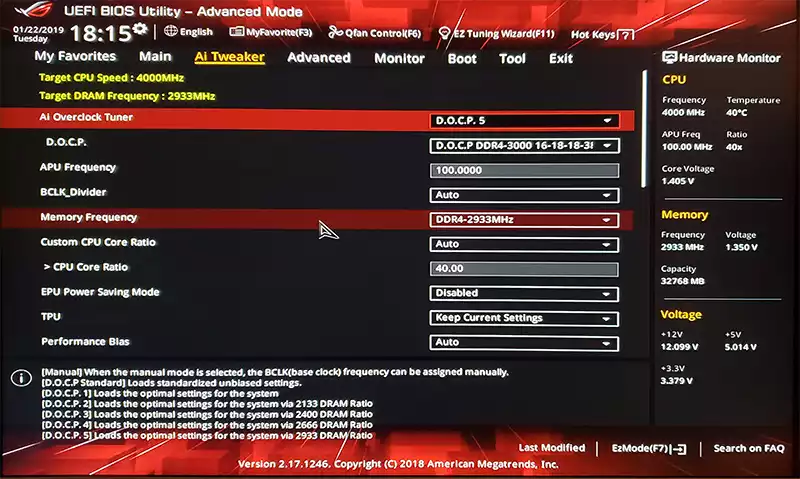
Now, go find the AI Tweaker option, and scroll through all the choices until you find the Memory Frequency setting. This setting, as the name implies, allows you to manually change the memory frequency of any one RAM stick on your PC. It’s important to take note of this in case you want to underclock one stick for compatibility.
Step 3: Change your memory frequency to the desired amount
This one is self explanatory, all you really want to do is pick the RAM stick you want to change the frequency for, and change the frequency to something that fits your needs. The dropdown menu available gives you all the possible preset frequencies, so it’s really just a matter of choosing what you want.
Once you’ve changed the frequency, don’t turn off your PC just yet. There are a few more tweaks that need to be done for the safety of your system first.
Step 4: Find DRAM voltage and increase voltage slightly
Now that you’ve successfully increased your memory frequency, tweak your DRAM voltage to better handle the new power up. Simply bring up the voltage slightly, and then save your settings. Now you’re all good to go! Once you reboot your PC, you can check your memory frequency and should see your new configuration doing its job. And with that, we’ve reached the end of this guide!
We hope this guide helped you with changing the memory frequency of your PC through your Asus motherboard’s BIOS settings. It’s actually a relatively simple process once you know exactly what you’re doing, and it’s a painless procedure overall. Just make sure you don’t fiddle around with unknown settings too much, and you’ll be good to go.
More stories like this
- How to enable Intel XMP profiles to unleash your RAM potential
- What are DIMMs and what are they used for?
- How to allocate more RAM to a game for improved performance
- Where does the CPU store its computations?
- Corsair Dominator Platinum RGB DDR5 review
- Corsair Vengeance RGB RT Review