You can also be interested in these:
- Top 10 best white monitors PC gamers need in their rigs
- Corsair Xeneon Flex monitor full review
- What are the BenQ RL2755HM best settings for PS4?
- Corsair Xeneon 32QHD165 gaming monitor review
How many times have you encounter yourself with the predicament you need to capture a small video to use it as a small demo or reference of your work, but you don’t have the tools to achieve this, or just don’t know how? On this short guide we’ll show you 3 methods on how to capture your screen on Windows 11, from the most natively one to third party options.
The screen capture and and screen recording are features other operative systems have implemented as part of the native toolset for the users. Windows 11 however, despite being a revamped and improved system there is no way to to do it, without setting a few things before. Wouldn’t it be awesome if just by pressing a few keys we could record a small footage of our screen? Well, there is one way to do it on Windows 11 without installing any other software.
Record screen in Windows 11 with Xbox Game Bar
The Xbox Game Bar application is shipped in the same Windows 11 installation package, ever since the launch of Windows 10. This utility tool sits on top of your screen, overlaying all other applications running on your Windows 11 computer, and is always active. It was intended for gamers to have a means to capture the screen while playing for sharing or streaming online. It not only allows you to record your screen, it does so trough several ways:
- Open Windows 11 “Start” menu and type “Xbox Game Bar”. It will pop up from a list.
- Launch it and record the screen manually by pressing the “Rec” button.
- Alternatively, you can launch the Xbox Game Bar app by pressing Windows Key + G. This way, it is quicker and more convenient.
- Also, if you want to skip an extra step, you can record directly by pressing Windows key + Alt + R keys at the same time.
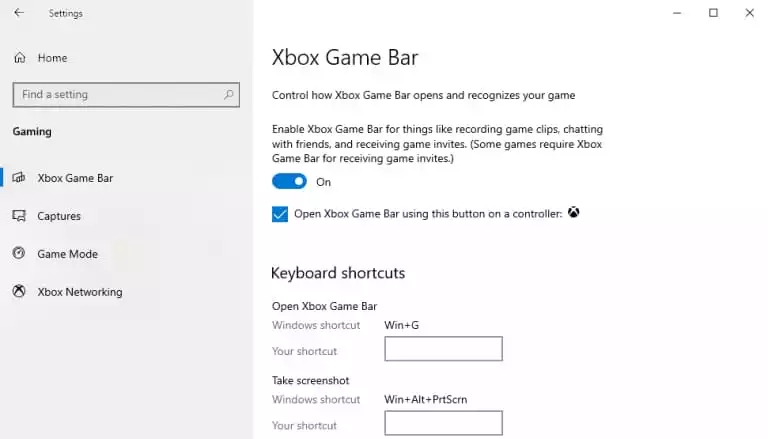
If you can’t access the Xbox Game Bar options it might not have enabled that functionality beforehand. To activate it, go to Windows > Settings (Cog wheel icon) > Gaming. Then, enable the option that says “Record game clips, screenshots and broadcasts using Game Bar”.
There is an important caveat to this last method you need to take into account. Unlike Windows 10, it seems that it doesn’t let you know that you are recording the screen when you press those 3 keys at the same time. However, it will be recording until you press the same key combination again to finish recording.
After you are done recording your screen on Windows 11, you can find your video files on the following path:
C:\Users\Your User\Videos\Captures
What quality settings does Windows 11 record the screen?
Well, it depends on whether we record in full screen or a maximized window with the taskbar in between. For some strange reason the developers of this app thought we won’t need this utility app for recording anything regarding the Desktop or while in File Explorer. It will only capture the active application window at any given time.
If we record and go to the details of the file, we find that it records at 1920 x 1032 (if you have a 1080p monitor) at 518 kbps. The video will try to emulate the same resolution settings of your monitor, but it will crop the task bar at the bottom of the screen, hence the height is less than 1080 pixels.
Due to the aforementioned limitations, this won’t be a definitive solution for many. The fact that you don’t need a third party software to record your screen on Windows 11 comes with a price. If you wanted to record a small footage managing files and folders, or your Desktop, you won’t be able to do it. This added to the inconvenience if you wrongfully started recording, or didn’t stop it properly, you could end up with hours of footage without even realizing it.
Set up Xbox Game Bar to record screen
It is possible to adjust certain parameters for those who want to gain control of the output of the video with certain settings, so let’s see how we can configure the Xbox Game Bar for it on these easy-to-follow steps:
- We open Xbox Game Bar, click on the gear icon on the top panel and we head to the capturing option. There we can make some quick adjustments on what we want to record and how to achieve it.
- If you want to configure more advanced options, open the start menu and go to “configuration”.
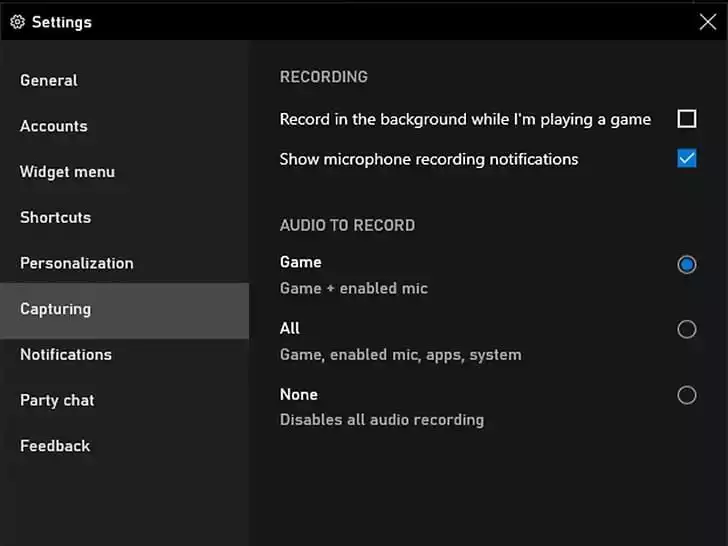
- Once you have configurations opened, you go to the “Games” menu and then to “Screenshots”. Here you can set the following:
- Save folder
- Frames per second
- Video length
- Video quality
- Audio or not
- Cursor or not
- Graphics
How to record screen with OBS Studio in Windows 11
This software is the preferred option used for game and video streaming. It includes the functionality to record the screen, so it makes it extremely easy to do on Windows 11. Another plus to using this software as an alternate method of recording your screen is that is completely free, including some of the most advanced features other top payed options have, all at your disposal.
Here are the steps how you can record your screen with OBS Studio:
- Download OBS Studio. When you install and run it for the first time, an installation wizard will appear that allows us to optimize the configuration for streaming or recording.
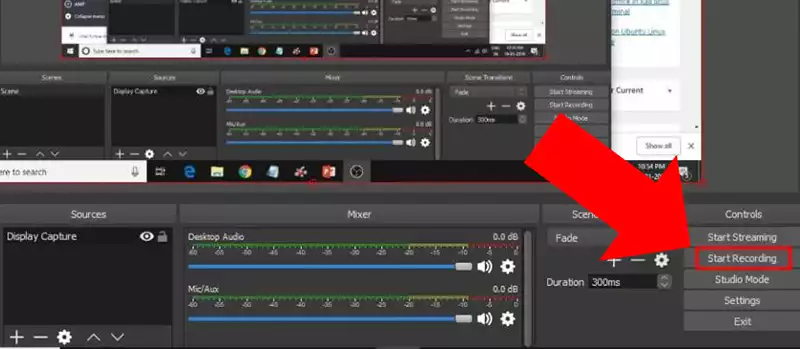
- Once executed, you have to go to the area where it says “Sources” and left click on the plus (“+”) sign to display a series of options. Choose “Screen Capture” or “Window,” depending on what you want to record at the moment.
- You create the source and then you click “Ok”.
- You will have to select the main screen or the monitor you want.
- Once finished, in the “Controls” section, we click “Start recording”.
- If you minimize the OBS application, you can record everything you want and when you want to finish, you open it again and click “Stop recording”.
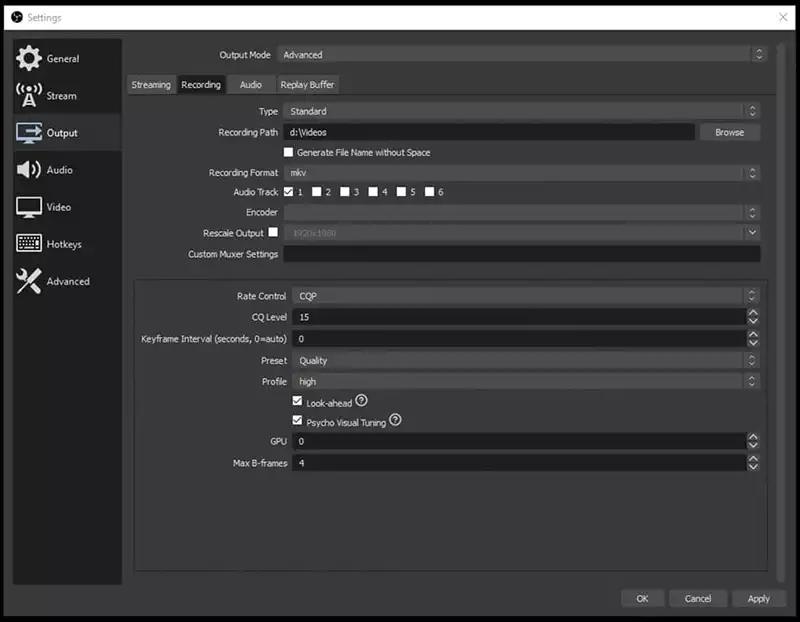
- The video files are usually recorded in the Windows 11 “Videos” folder, unless you have changed it, and the format is usually “mkv”. This format can be changed as well.
Regarding the configuration of video quality, format, etc., you can set these from the settings menu in OBS Studio. Here, you need to proceed with caution with what you want to configure, because OBS Studio has really advanced features, and can be really detailed in the things that can be changed to give the user freedom. If you set your options beyond your hardware capabilities the software will just execute your guidelines, until your computer cries.
There are more softwares available that can help us record the screen in Windows 11, but we believe that it is not necessary to dive deeper into this matter having the two options we have already given. The other options will be also extremely useful, but they will always have a downside to them, being price and limited set of features two of the most important.
If you are still curious about what other options are available, we can recommend Streamlabs and Fraps. These are payed software tools, offering pretty much the same features you will have with OBS. You will also find they might seem old and outdated. In fact they are.
Using the NVIDIA or AMD software
Technically, the Nvidia or ADM software from your video card shouldn’t be considered as a third party option for recording your screen in Windows 11. You actually need these in order to setup your graphics card and use it as a controller interface. In the case of AMD, we have Radeon Software or Radeon ReLive, which could be considered a third-party application because we will have to download it specifically.
Using Nvidia products we have the same 2 possibilities: do it with GeForce Experience (which comes with the drivers) or download Nvidia ShadowPlay, which is a super specific application to record and capture footage from our gameplays.
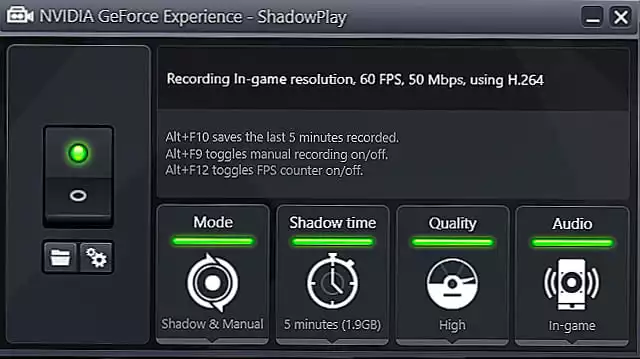
To do so in both AMD and NVIDIA, you will have to open the control panel of AMD Radeon or GeForce Experience respectively. For instance, to do it from GeForce Experience, you have to go to program settings (gear icon) and you click on “settings” and then “in-game overlay”. There you will have several options to configure.
More stories like this
- Top 10 best white monitors PC gamers need in their rigs
- Corsair Xeneon Flex monitor full review
- What are the BenQ RL2755HM best settings for PS4?
- Corsair Xeneon 32QHD165 gaming monitor review
- Gigabyte Aorus FO48U gaming monitor full review
- The Gigabyte M32Q gaming monitor – In depth review