You can also be interested in these:
- A comprehensive guide on how to pick the right laptop for work
- How to keep your computer awake without moving your mouse
- How to connect Airpods to HP laptop
- How to factory reset your Nextbook laptop
Laptops are a lot more finicky than desktop computers when it comes to extending their hardware capabilities performing component upgrades. In the case of laptops there are a few upgrades we can do ourselves, without the need to have them checked by a professional technician. If you flip your laptop over, you will notice a series of latch compartments (other than the one for the battery), corresponding to each component able to upgrade. These doors are easily identifiable because they have a screw holding them in place. In this article we will cover how to remove a hard drive from a Toshiba laptop.
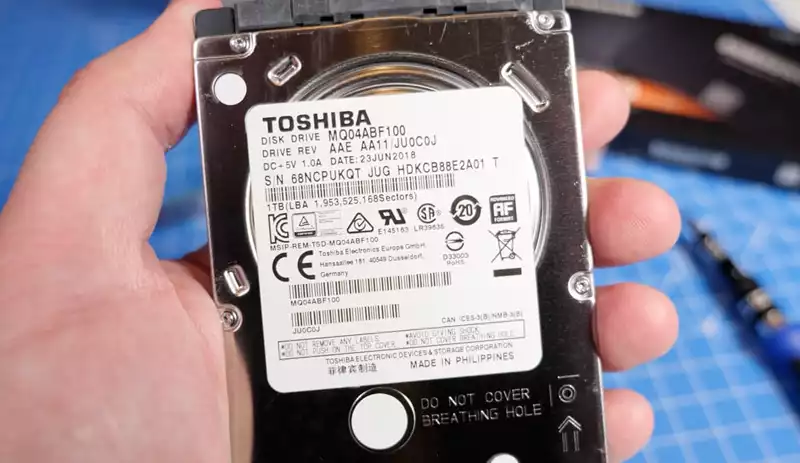
How to buy the right replacement hard drive for my Toshiba laptop
The best way to make sure you are getting the right replacement hard drive for your Toshiba laptop is to refer to the specifications data sheet of your specific model of laptop. To get to the official Toshiba laptop support page, you can visit this link. However, for the average user this might seem a really daunting experience, since there is a lot of information there that might not be familiar.
In reality, there are only a few things you need to know in terms of specifications to get it right on your new hard drive. To ensure they are compatible you need to check the following:
- First and foremost, you need to know what the highest hard drive capacity is for your Toshiba laptop. Obviously, you don’t want to go beyond this metric. You can get this information from the laptop data sheet.
- Both hard drives need to have the same physical size. Most Toshiba laptop computers use 2.5-inch hard drives, but they come in different heights. For older model laptops, the most common height measurement is 9.5mm, being 7mm the thinnest hard drive you can possibly get.
- The last thing you need to know is the hard drive interface. The most common interfaces are IDE and SATA, being the latter the most popular these days. The SATA interface supports backwards compatibility and high-speed data transfer. Even if your Toshiba laptop only has compatibility with SATA 2.0 interface, you should be able to install a SATA 3.0 HHD without any inconvenience.
SSD’s as a hard drive replacement in my Toshiba laptop
The best and better cost-effective way to extending the life of your Toshiba laptop is to upgrade to a Solid State Hard Drive or SSD. SSDs are cheaper and more accessible than ever before, and they are fairly easy to install in your computer as well. However the real benefit of having an SSD has nothing to do with accessibility, but performance.
SSDs differ from its counterpart, the mechanical hard drives, in the lack of moving parts to perform the data storage operation. This makes them a lot more reliable, durable and fast to do their work. Additionally Solid State Drives are proven to be more power and energy efficient than conventional hard drives, and produce cero noise while working.
On the down side, they do come with a higher price tag compared with mechanical hard drives, but this price is worth every penny. You will be thrilled to make this investment when you realize your operating system will go from 45 seconds boot time to only 9 seconds.
One last recommendation is, when buying a replacement hard drive for your Toshiba laptop is to also buy a USB to SATA adapter cable. They are really inexpensive and will help you later in the process to backup your data. You can get one of these from Amazon.
What would I do with my old data files? Creating a duplicate of your data
Here comes the dilemma: Should I install Windows from scratch, or should I copy all my files in the new hard drive to continue using it as normal? You can do either of the two options, but it will be so much easier for you just to copy all your data files to your new hard drive. Moving forward, you can decide if you format it or keep using it as is.
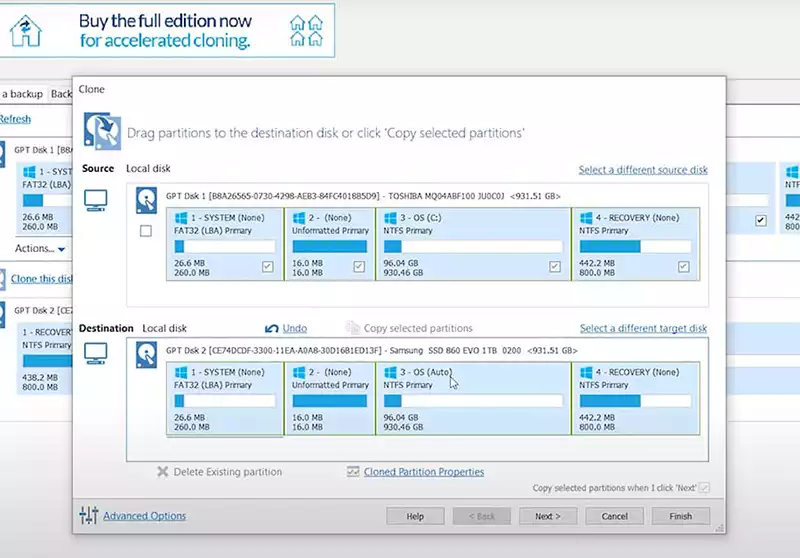
If you went with any hard drive brand, other than Samsung (see below), we recommend you download the latest version of Macrium Reflect, to do your data backup. You can download it from this link and opt-in for their free trial. I am sure this will be the only occasion you will use the software.
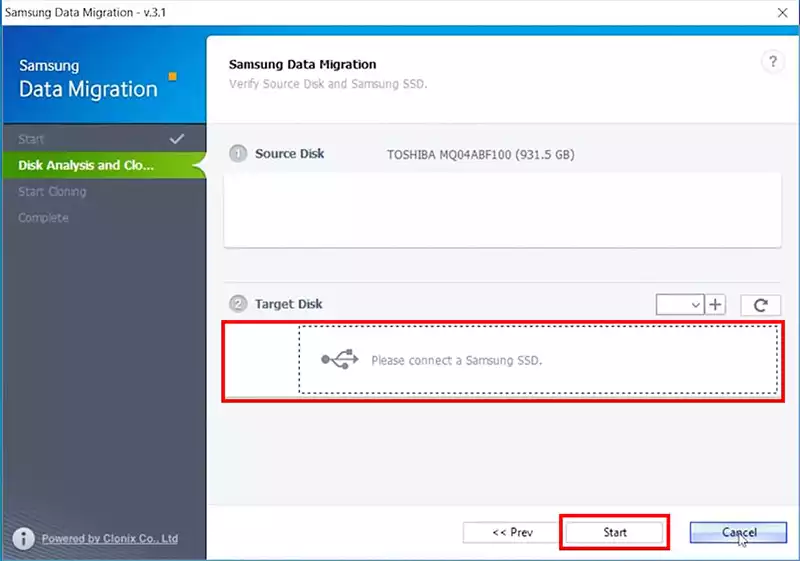
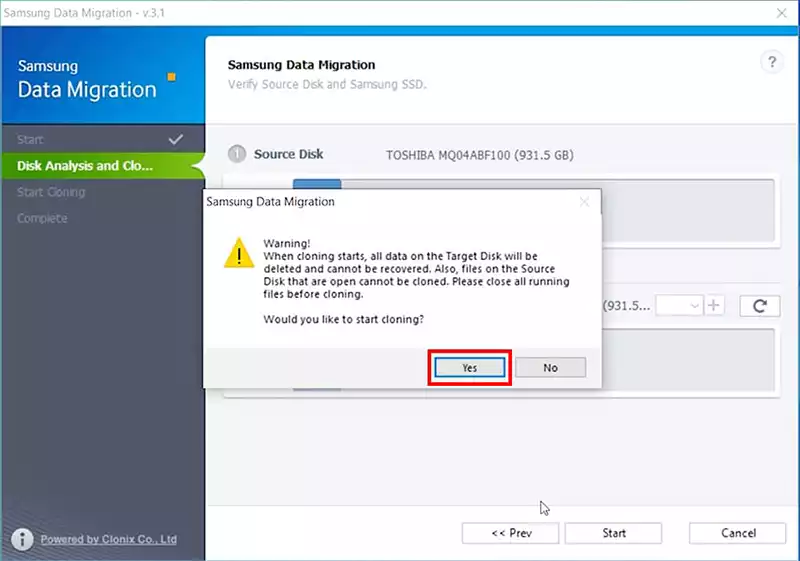
If you buy a Samsung hard drive we recommend you download the Samsung Data Migration Software from this link, to move your files to your new storage device. Connect your new hard drive to your computer using a USB to SATA adapter cable, as we advised to acquire previously.
Once you have the software installed and your new hard drive connected it should pop up on the cloning software your as a target. Start the cloning process and in a few minutes you shouls have a working copy of your old drive with operating system included.
Now, how to remove a hard drive from a Toshiba laptop?
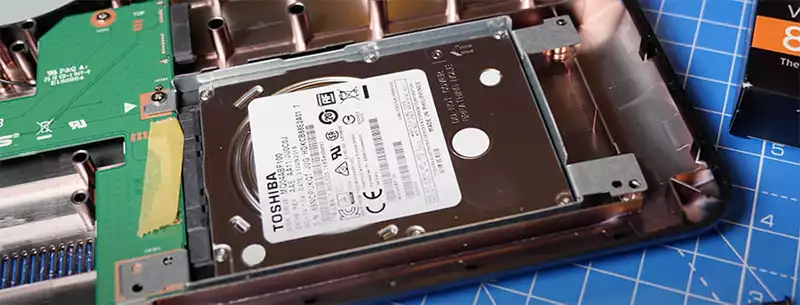
Many Toshiba laptops will most likely have easy access panels. However, depending on the model, there are a few cases there will be a single plastic shell covering the bottom part of the laptop completely. If you flip over your Toshiba laptop and notice a single lid cover on the back of it, you can still remove it to access the hard drive compartment.
First things first, disconnect the power supply cable from your Toshiba laptop and remove the battery. Grab a Philips screwdriver and remove all visible screws from the back of your device. There is one particular screw that is holding the DVD/CD reading unit from sliding out. Once you unscrew it, try to slide it out from its dock. Also, check inside the battery compartment, to see if there are more screws to loosen. In some rare cases, you will also have to remove the rubber feet to access a few screws in that location. Once you have unscrewed all the fasteners you should be able to pry open the back lid.
If your Toshiba model includes easy-access ports or doors, just locate the door corresponding to the hard drive (the size will somewhat suggest which one it is) and remove the screw that holds it in place.
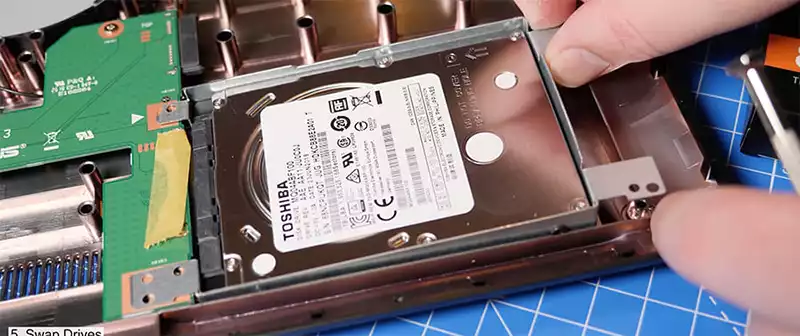
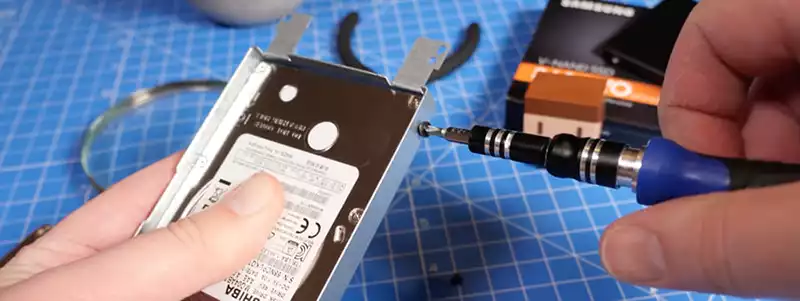
You will see immediately the hard drive on your computer. Proceed to remove the 4 screws of the hard drive and slide it out from its position, opposite to the direction of its connection ports. The hard drive will come out with a metal or plastic cradle, in order to install the new hard drive you need to remove the screws in this alternate mount to liberate it.
Replacing the hard drive in a Toshiba laptop
Now here comes the fun part, you will have to literally do all steps you have already done in reverse, but now using your new hard drive as the target of the installation. Make sure when sliding the hard drive mount back in place, not to force the contacts into the ports. They should go in without any extra force.
After everything is back in place you should be able to reconnect the power supply cable and battery in your Toshiba laptop and turn it on. If you followed all the steps in this guide you should have an upgraded Toshiba laptop ready for even more years to come.
More stories like this
- A comprehensive guide on how to pick the right laptop for work
- How to keep your computer awake without moving your mouse
- How to connect Airpods to HP laptop
- How to factory reset your Nextbook laptop
- How to check if your computer has Bluetooth
- How to clean rubberized laptop surfaces