You can also be interested in these:
- How to fix the computer has rebooted from a bugcheck error
- How to change the language in Windows 11
- How to configure parental control in Windows 11
- How to fix the Microsoft system error 8646
It is important to know how to configure Windows Update in Windows 11 because there are new features and quick fixes that are being constantly pushed to users in order to maintain the reliability of the system operations, specially true due to the short time since its release. However, for some, it is a real inconvenience to have due to the intrusive behaviour Microsoft has given to this update system.
Also in the security aspect, with the number of vulnerabilities, exploits and ransomware that threaten the integrity of our systems, it is important to have Windows Update active and well-configured. Microsoft is launching update packages for users to keep their computers protected. Let’s delve into Microsoft’s Windows 11 settings to see how to configure these options, or disable Windows Update instead, depending on your preference.
What are the Windows Update new features in Windows 11?
As always, we can access Windows Update through the configuration menu or searching for it from the start menu. Now, Windows 11 offers a default search engine in the taskbar you can use to achieve the latter task.
We will have a much more simplified interface wit a facelift, similar to the Windows 11 interface, but the main options remain the same. Here is a comparison of the before and after (Windows 10 on the left and Windows 11 on the right).
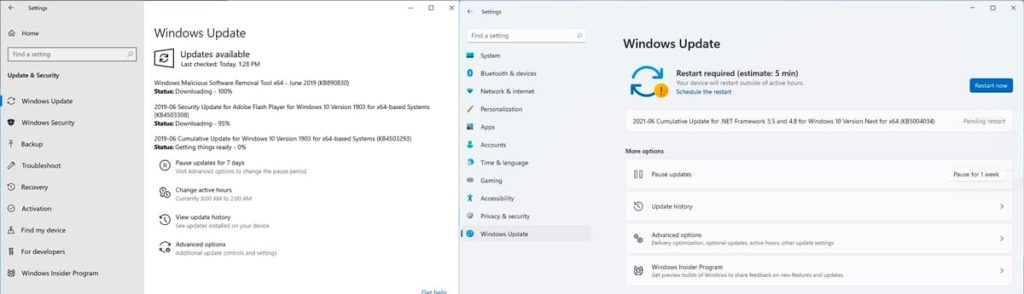
Now Windows Update is the last option in the left column, and the whole look has been revamped (although the Windows font remains the same). We will enjoy the 4 main options:
- Pause updates. We can pause them for up to 5 weeks.
- History of updates. Not so much to add about this section, it is simply a registry of the updates that we have installed.
- Advanced Options. We find new features, having more options than the former Windows 10 edition. We can configure Windows Update more thoroughly in Windows 11:
- Updates to other Microsoft products.
- Give top priority to Windows Update and automatically update after downloading the update, even when we are using the PC.
- In the case of tablets or laptops that make use of mobile data from a SIM, we can allow or disable it.
- The active hours of Windows 10 are included within the advanced options: this function is not lost, but is organized differently.
- We have the regular options that have to do with the overall system operation, but additionally we also have alternative options, with optional updates.
- Windows Insider program. This function is displayed within Windows Update to receive updates before any other Windows 11 users who are not in the program. There is a caveat to this: Windows Insider is a beta tester program and you won’t be receiving final release versions of the updates every time, instead these “updates” are some sort of nightly versions of the updates. That is the concept behind the Windows Insider program. In Windows 10 we had this option, but not as part of Windows Update.
Now the user has a fairly amount of control of the download speed of the updates. Before, you literally had to leave your computer updating being unable to use it. In contrast, now we are able to limit the download speed and bandwidth of the updates to be able to use our computer while updating.
Additionally, we can configure the download bandwidth that you want to assign to Windows Update so that the relevant updates are downloaded. This option is extremely useful because, sometimes, other web pages or programs that use the network connection in parallel may slow a bit.
In the case of the Windows 11 Pro version, we can choose to download the same update on other computers that are connected to the local network to simplify the process.
Configure Windows Update in Windows 11
Little has changed in the way of configuring this update tool, and our options are summarized here:
- Pause or not updates. Unless you want Windows updates to not bother you for a while, don’t activate it.
- Download existing updates. Normally, Windows will do this by default, but you can access Windows Update in Windows 11 and immediately download whatever is available. This option was present in Windows 10.
- Set the active and non-active hours so that Windows can differentiate when it may be more advisable to update, because it will understand that we are not busy using the system at that point in time.
- Restart as soon as possible with “update me”.
- Notify when reboot is required to finish update (on / off).
- Enable the download of updates when we are using our mobile data plan.
- Active hours can be configured manually or automatically.
- Optional updates.
Disable Windows Update in Windows 11
We couldn’t finish this article without including this section. Many Windows users find updates a little obsessive to their taste, and having the option of disabling them is a comforting capability. We highly discourage this action because you can’t discriminate what’s just a minuscule change from what could be a major or important update in your system. In other words, if you turn Windows Update off your computer will be unprotected. Proceeding further in this process goes on your own risk.
Here are the steps to disable Windows Update in Windows 11:
- We press Windows key + R, we write “services.msc” (without the quotes) and we press OK.
- We look for “Windows Update” (it is at the end), we double-click it and press “Stop” and we open the drop-down that says “Startup type”. We are going to set it to “Disabled”.
- You press to apply and then accept.
- Finally, we restart the computer.
This should work, but if what you really want to do is annihilate Windows Update in Windows 11, this task is a little more difficult than this. We would have to find the corresponding Windows Registry and edit it.
- We open the start menu and look for “regedit”.
- After opening it from the results, we follow this path:
HKEY_LOCAL_MACHINE \ SOFTWARE \ Policies \ Microsoft \ Windows \ WindowsUpdate - If there is no Windows Update folder, create it by right-clicking on the displayed Windows folder, and clicking on new > folder.
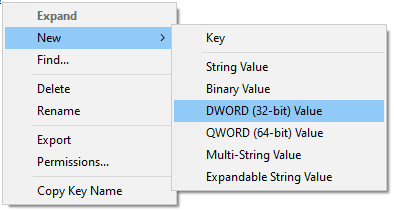
- In the section on the right (which shows what’s inside of the selected folder), we right click and create a DWORD value (32-bit). We are going to call it “NoAutoUpdate” and we set its value to 1 (you can set it by right clicking on the created DWORD).
- You restart the PC.
We hope this information has been helpful to you. If you have any questions, you can comment below and we will answer you right away. You can also contact us through our social networks.
More stories like this
- How to fix the computer has rebooted from a bugcheck error
- How to change the language in Windows 11
- How to configure parental control in Windows 11
- How to fix the Microsoft system error 8646
- How to install DirectX in Windows 11
- How to install Windows 11 on VirtualBox step by step